3 Simple Steps to Add a Signature to a Word Doc
Do you want to add a signature to a contract, a lease agreement, or any other document in MS Word but aren’t sure how to do it?
In this article, I have all the answers for you.
Like most of its other features, MS Word makes adding a signature to any document pretty simple. You don’t even need to manually add a signature line to your documents.
In just a few clicks, Word will add a professional predesigned signature section to your document that is acceptable worldwide.
Let me show you how.
3 Ways To Add A Signature To A Word Doc
We’re living in the digital age where most contracts, agreements, and signed documents change hands over the internet.
This is why businesses use multiple types of signatures in their legal documents depending on the nature of the transaction.
With MS Word you can sign your documents using three different methods.
- Electronic Signatures
- Digital Signatures
- Add A Signature Lines
These are authentic and secure signature types that are not only accepted as your legal signatures but are also good for the environment since they minimize the need for using printed documents.
Let me describe each method in more detail and how you can use it for signing documents in Microsoft Word.
Method#1: Adding An Electronic Signature To MS Word
Adding an electronic signature to your Word document gives it a personal touch and makes it authentic at the same time.
It is also the most common method for singing documents in MS Word and doesn’t take much time once you set it up on your computer.
But what exactly is an electronic signature?
What Is An Electronic Signature?
An electronic signature is an image file of your handwritten signatures that you can add to any document you want.
It is different from digital signatures that I’ll cover later in this article.
To create an electronic signature, you’ll need to physically sign a document and use a scanner to convert it into an image file that can be used in different documents.
Once you have a scanned version of your signatures, you can use it as many times as you want.
Using electronic signatures is a popular practice because of its ease of use and flexibility.
Here’s how you can add an electronic signature to your documents in MS Word.
How To Add An Electronic Signature To A Word Doc
You can add an electronic signature to any Word document by following the steps below.
Step#1: Take a clean piece of white paper and handwrite your signatures with a black pointer or pen. Before signing the paper sheet, I recommend practicing your signature on a separate piece of paper a few times to avoid any mistakes. Using black ink is preferable because of better visibility after scanning.
Step#2: Scan your signature using a scanner machine or mobile phone with a good camera and a scanner app. Scan the document at 600dpi and then save the image in the .PNG format. You’ll need to crop the scanned image to only focus on your signatures.
Step#3 (optional): Open the scanned signature in Adobe Photoshop and copy it using the Magic Wand feature. Now create a new file in Photoshop with a transparent background and paste the signatures to it. This is an optional step but it’s useful because it’ll allow you to use your signatures on documents with colored backgrounds as well.
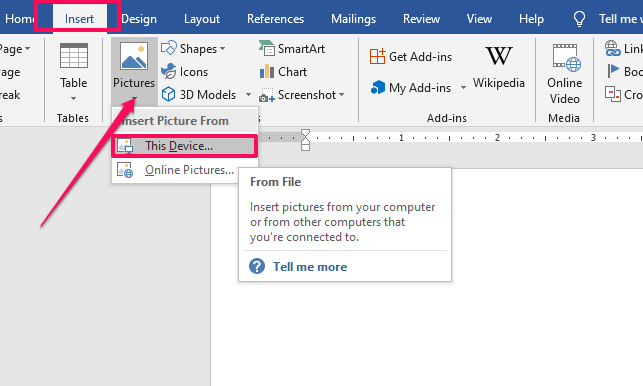
Step#4: Open MS Word and insert the scanned signature int oy our document by click on Insert–>Pictures–>This Device
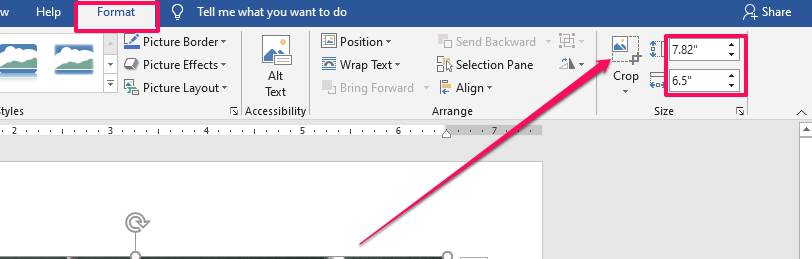
Step#5: If you haven’t already cropped the image, you can do it in Word as well by clicking on it and using the Crop feature. You can also modify the size and dimensions of the image from this section.
Step#6: You can now simply drag the image with your mouse to the signature section of the document.
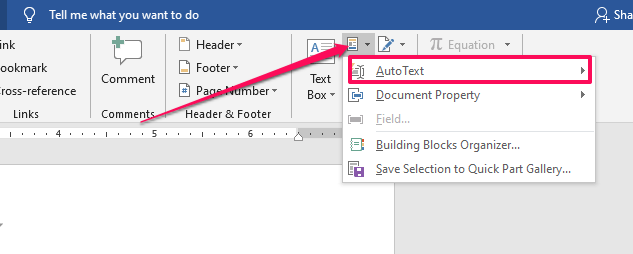
Step#7: If you want to add additional information below your signature like your name, designation, etc. type the text you want to show under the signature image. Then select both the image and the text content, and click on Insert–>Quick Parts (in the Text section)–>Auto Text–>Save Selection to Auto Text Gallery.
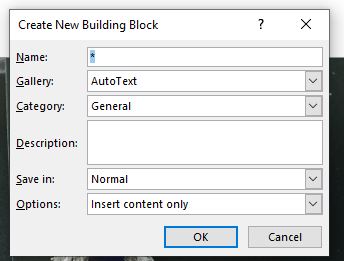
Step#8: In the Auto text pop up, add your name to the Name field, select Auto Text in the Gallery Field, and click Ok.
Step#9: Now whenever you want to add your electronic signatures to a Word document, take your pointer to the right place and click on Insert→ Quick Parts→ Auto Text and choose the name with which you saved your signatures.
That’s it, you can now add your electronic signatures to any Word document you want.
Method#2: Adding A Digital Signature To Word Doc
Another popular way to securely sign your documents in MS Word is to use a digital signature. It’s an encrypted signature method that allows the secure transfer of documents that can only be accessed by authorized persons.
They are based on a unique ID which means there’s no chance of any impersonation or identity theft.
What Is A Digital Signature?
Digital signatures are highly secure encrypted digital IDs that require a valid digital certificate from both the sender and the receiver of the signed document.
Every digital signature has a private key that can only be validated with a public key that comes with a valid digital certificate. When you have a valid digital certificate, you can use it as an authentication method for digital information (including Word documents)
What Is The Difference Between A Digital And An Electronic Signature?
An electronic signature, as I’ve already mentioned, is simply a scanned image of your real-world signatures. Most people mistakenly refer to it as a digital signature.
A digital signature is a technical term used for encrypted signatures backed by a valid digital certificate issued by a reliable third-party certification authority. They’re used to secure Word documents, provide authentication, and protect them from any unauthorized changes.
How To Create A Digital Certificate For Free
You can only get a valid digital certificate from a trusted third-party certification authority (CA). Many independent certificate authorities offer limited time (usually one year) digital certificates for a fee. But you can also get digital certificates from trusted third-party entities for free.
To get a free digital certificate to sign your documents in MS Word, follow these steps (for Windows 10).
- Go to C:\Program Files (x86)\Microsoft Office\root\ (or C:\Program Files\Microsoft Office\root\Office16 if you’re running the 64-bit version of Office)
- Run the application file SelfCert.exe to open the Create Digital Certificate box.
- Give your certificate a descriptive name and click OK.
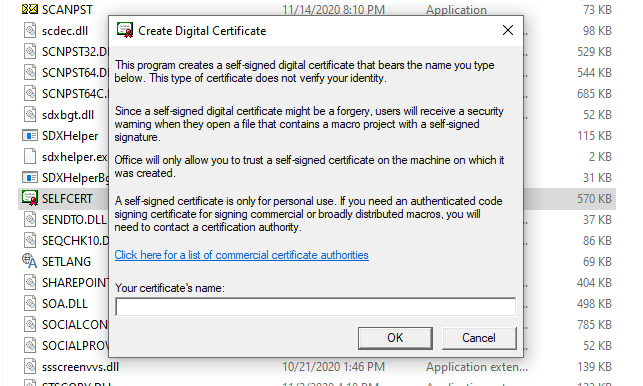
That’s it, you have a valid digital certificate that you can use to digitally sign documents in MS Word. However, this is not verified by a trusted third-party and therefore some organizations might not accept it as a valid certificate.
You can view your certificate in Chrome→ Settings→ Privacy and Security→ Security→ Manage Certificates→ Personal
Let’s now see how you can add a digital signature to Word documents.
How To Add A Digital Signature To A Word Doc
Follow these steps to add a secure digital signature to your documents.
Step#1: Open MS Word and place your cursor where you want to add the digital signature.
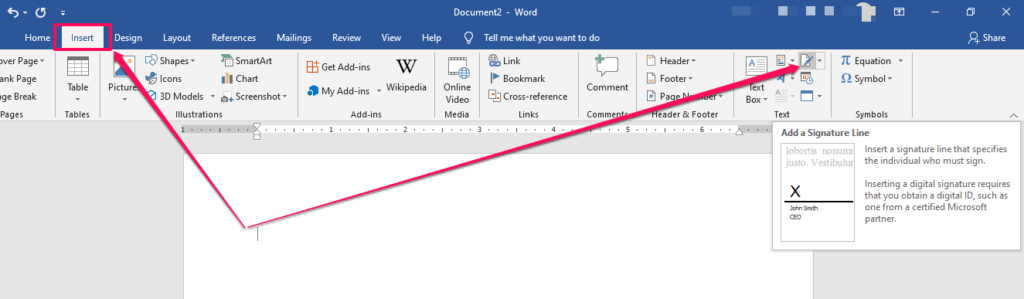
Step#2: Click on Insert→ Text→ Signature Line to open the Signature Setup box.
Step#3: Enter the relevant details of the signer in this box (name, designation, email). You can add an instruction note for the signer (or use the default note) along with a comments section, and the signing date.
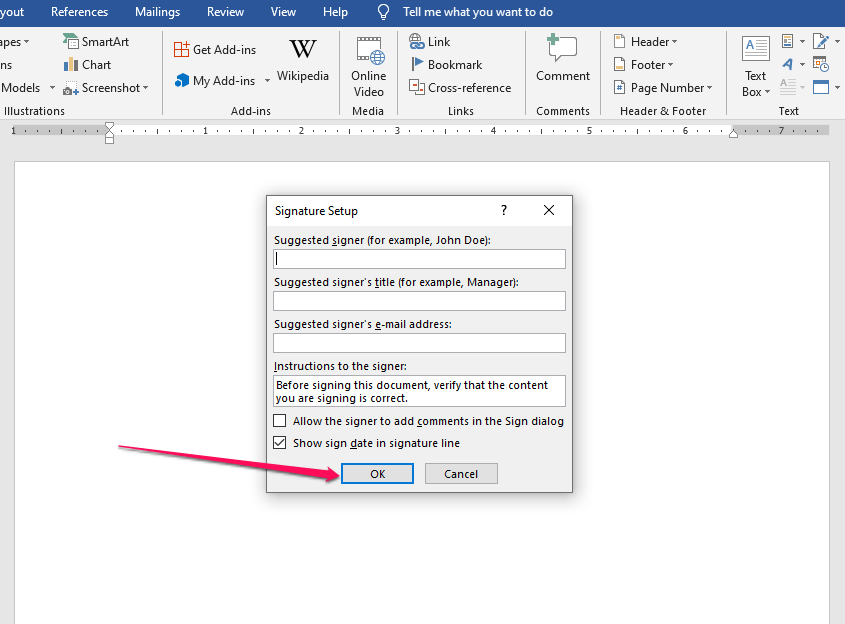
Step#4: Click OK to add a digital signature box to your document.
Step#5: To sign this document, double-click the signature box or right-click and select Sign.
Step#6: You can digitally sign a Word document either by typing your name or by uploading an image of your handwritten signatures. Both options are backed by your digital certificate.
Step#7: You’ll need to save the document before signing it.
Step#8: This will add a digital signature to your document using the certificate you created earlier. The signatures will remain valid as long as no other changes are made to the document.
How to Draw Your Signature
If you have a touch-enabled device, you can draw your signature using your finger, a pen, or a regular mouse.
Here’s how it works.
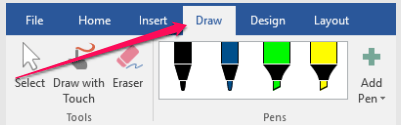
Step#1: Switch to Print Layout in Word from the View section.
Step#2: Click on Draw and choose your pen type.
Step#3:Use your pen, finger, or mouse to draw your signature in the appropriate section of the document.
Method#3: Adding A Signature Line To A Word Doc
Sometimes you need to get your documents signed the old fashioned way. You can simply present a document to the signer and ask them to sign wherever they want.
Or you can be a bit more professional and add a signature line to your document so that the signer knows where to sign even if you’re not personally there to guide them.
Unlike the previous two methods, you don’t need a digital certificate or a scanned copy of your signatures for this method to work.
How To Add A Signature Line To A Word Doc
To add a signature line to your Word documents, follow these steps.
Step#1: Take your cursor to the section of the document where you want to add a signature line
Step#2: Click on Insert→ Add A Signature Line to open the Signature Settings box.
Step#3: If you want the signer’s name and designation below the signature line, fill this information in the Signature Settings box. Otherwise, leave it black to display a plain signature line.

You can now print the document and send it to the relevant person for their signatures.
Why It’s Important to Save Your Word Doc as a PDF
No matter what signature method you’re using, make sure you save your Word documents as PDF files once they’re ready to be sent to the signer.
This is important because PDF is a secure document format that does not allow users to make any changes to it. When you send a legal document or a contract that needs to be signed as a PDF file, you can rest assured that no one can edit its content.
Saving a Word document as PDF is really easy in Microsoft Word.
Simply click on File→ Save As and choose .PDF from the file type dropdown.

Keep the original Word document separately so that you can make changes to it in case there’s a need. If that happens, you’ll need to save the Word document in PDF format again before sending it to the relevant person.
How to Change Your Signature in Word
The process for changing your signature in MS Word depends on the type of signature you’re using.
Electronic Signature: If you’re using a scanned image of your handwritten signature for electronically signing documents in MS Word, you’ll need to upload an image file with your new signatures using the same process I described earlier in the Electronic Signature section of this article.
Digital Signature: If you’re using a digital signature, you’ll need to create a new digital certificate using the same process I described in the Digital Signature section. Once you have the new certificate, you’ll need to create a new signature in Word from Insert→ Text→ Add A Signature section.
Signature Line: If there’s a change in the signer’s name or designation, you can change it from the Add a Signature section. Otherwise, leave the signature line untouched.
Are You Ready To Add Your Signature To Word Documents?
As you can see, adding a signature to MS Word documents is quite simple. However, it gives authenticity to your documents, makes them more secure, and adds a professional touch as well. Let me know if you have any questions about the different signature methods I’ve described in this article.

