How to Install Office 365 (for Every Office 365 Plan on Every OS)
Need to run Microsoft Office 365 on your computer?
An Office 365 install only takes a few minutes, even if you’re adding it to multiple devices. Some subscription plans even let you share the suite with other users at no extra cost.
This post explains which editions of Office 365 come with installs and which are purely cloud-based. You’ll also find step-by-step instructions for installing Office 365 on:
Don’t have an Office 365 subscription yet? Or not sure which subscription is going to work best for you? Start by getting to know Office 365 plans and pricing.
Which editions come with Office 365 installs?
Office 365 is a cloud-based productivity suite. Depending on the subscription you buy, though, you may have the option to install Office 365 apps directly onto your desktop or mobile device.
In addition to giving you full offline access, the desktop apps are much more feature-rich than their cloud-based counterparts.
Here’s a quick breakdown of which purchase plans include Office 365 installs:
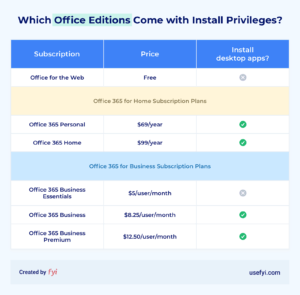
If your Office 365 plan doesn’t qualify for desktop installs, you’ll only have access to the core apps available through Office for the Web.
Pre-installation steps for Office 365 on Mac and PC
Before you begin, make sure your Mac or PC meets the system requirements.
Do you have a Microsoft Account? All versions of Office 365 require it, and you can create one here with an email address you already use.
If you’re installing Office for the first time, there may be additional steps you need to take before you get started. For example:
- If you have an Office for Home plan, and it came with a product key, you need to sign into your Microsoft Account and redeem it.
- If you have an Office for Business plan, you won’t see the option to install desktop apps unless you’re assigned a license.
You may run into some other issues if you got Office 365 through a third-party vendor, a company benefit program, or if your IT department uses different methods for their volume license version. You can find help with those and other issues with your Office 365 install here.
Once you’re all set with these pre-installation steps, you should be good to go.
Step-by-step instructions for installing Office 365
For Mac
The Office 365 install steps for Mac may be slightly different if you bought it through your company’s Microsoft HUP or a school account. Find instructions here for these and other special-case scenarios for Mac Office 365 installs.
Otherwise:
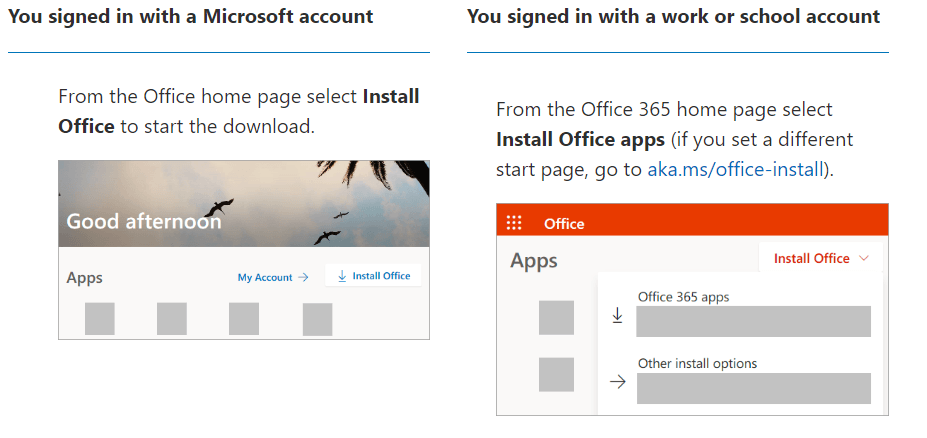
1. Log into your Microsoft Account.
2. On your account home page, select “Install Office.” The page will look different depending on what type of account you have:
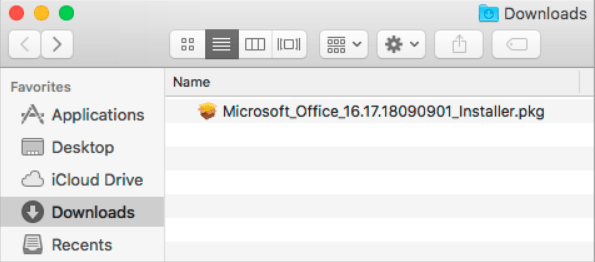
3. When the download is finished, open Finder and go to Downloads.
4. Double-click Microsoft Office installer.pkg (don’t worry if the filename varies slightly).
5. When the installation screen opens, click “Continue” to begin.
6. Review and “Agree” to the software license agreement.
7. Select how you want to install Office 365 (entire suite or just specific apps).
8. Review disk requirements and your install location, and then select “Install Software.”
Once you’ve successfully installed Office 365 on your Mac, go to Launchpad to start working with all your new apps.
If the install fails, or you can’t activate Office 365 on your Mac, check out these troubleshooting steps.
For PC
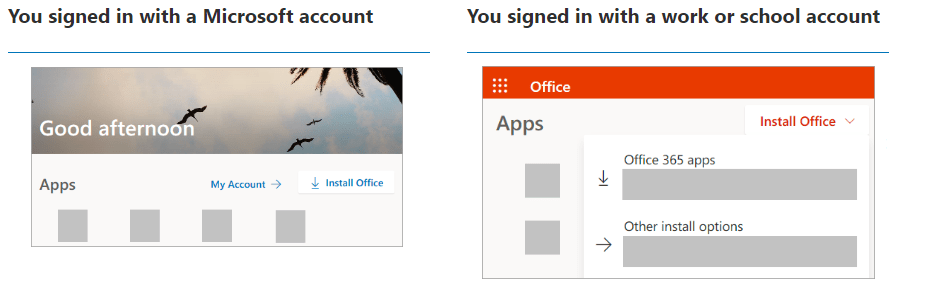
1. Log into your Microsoft Account.
2. On your account home page, select “Install Office.” It will look different depending on what type of account you have:
3. When the download is complete, your browser will allow you to begin the Office 365 install by selecting “Setup” (Chrome), “Run” (Edge or Internet Explorer), or “Save File” (Firefox).
4. Click “Yes” if a prompt appears asking you “Do you want to allow this app to make changes to your device?”
When the installation is finished, an animation will show you where to find your Office 365 apps.
Office 365 install for mobile devices
The Office for the Web mobile apps are free, but if you have an Office 365 subscription, you’ll be able to access extra features on iOS, Android, and Windows devices.
An interesting caveat: Any device with a screen size of 10.1 inches or greater requires a qualifying Office 365 subscription in order to create and edit files in Office mobile apps.
For iOS
- Open the App Store.
- Search the Office app you want, such as Word or Excel (the steps are the same regardless of which app you choose).
- Tap the app icon > download icon > “Install.”
- Once the installation is complete, open the app.
- Sign in with the same login you used to activate your Office 365 subscription.
- Choose whether or not you want notifications turned on.
After that, you’re all set to use the app on your iPhone or iPad.
For Android
- Open the Play Store.
- Search the Office app you want, such as Word or Excel (the steps are the same regardless).
- Tap the app icon > “Install” > “Accept.”
- Once the installation is complete, open the app.
- When prompted, “Allow” the app to access your files and contacts.
- Sign in with the same login you used to activate your Office 365 subscription.
Done. If your Android device already has other Office apps, your OneDrive files will automatically be added.
For a Windows Device
On most devices running Windows 10, the free Office apps are pre-installed. If you already have the apps and an Office 365 subscription, all you need to do is sign in.
If the apps have been uninstalled, or if you just upgraded and want to install the apps:
- Go to All Apps.
- Tap Store.
- Search the Office app you want, such as Word or Excel (the steps are the same regardless).
- Tap the app icon > “Free.”
- If you’re not already signed in, do so with the same login you used to activate your Office 365 subscription.
That’s it. Now it’s time to enjoy the native integration.
What to do if your Office 365 plan doesn’t have install privileges?
If you’re working with Office for the Web, Office 365 Business Essentials, or a donation version of Office 365 Nonprofit, you won’t be able to install desktop versions of the apps. Be wary of these limitations:
- Without the desktop apps, offline access is read-only. You can still share files, but you won’t be able to edit them or create new ones unless you’re connected to the internet.
- The features of the web apps are less robust than desktop apps. You’ll find that Excel for the web, for example, doesn’t have advanced time filtering or spreadsheet audit and compliance. Here’s a complete list of feature availability across web and desktop apps.
If continuous internet access isn’t an issue, and you don’t need the advanced features included with the desktop apps, then these limitations are a lot less serious.
But, if you’re running into problems, here are some workarounds that might help in a pinch:
- With a Microsoft account, you have access to one Office 365 Free Trial, which gives you 30 days to download and install premium versions of all the Office apps. You’ll lose access once your time is up, though.
- Have a school or university email? Office 365 Education is free for current students and educators.
- See if you can get Office 365 for free.
Still stuck? Remember Office 365 Support
No matter which subscription you pick, you will have access to Office 365 Support. So if you didn’t find an answer to your Office 365 install question, contact support at the bottom of this page or search Microsoft’s help articles.
Along with helpful information and chat-based support, you’ll find a ton of training modules there to help you get the most out of your subscription. The advanced features that come with the desktop apps are great, but only if you know how to use them.

