The Beginner’s Guide on How to Use Dropbox
Dropbox is a cloud-based file storage service that lets you backup files on your computer and access them from anywhere. There are plenty of other cool features, too, such as sharing, collaborating, and the ability to view previous versions of a document.
Basically, you can think of Dropbox as a big virtual file cabinet that stores all your important documents. If your PC breaks or you’re away from your regular computer, Dropbox has your back, making it easy to pull whatever you need from the cloud.
Sounds great, right? There’s a reason Dropbox has 600 million users and counting. In this beginner’s guide, you’ll learn what Dropbox is, how to sign up, and what kinds of special features make Dropbox a great choice for backing up and storing your important files.
What Is Dropbox? Should You Use It?
In recent years, “the cloud” has become one of those tech buzzwords that gets thrown around without everyone really understanding what it means. Basically, when you upload a computer file (a document, photo, etc.) to the cloud, it’s stored on the internet in addition to your personal computer, which means you can still access it even if your computer breaks, falls in a lake, or is otherwise inaccessible.
Dropbox uses cloud storage, storing your files on lots of computer servers located in various places. This is a good thing, as it means your files are backed up and then backed up again.
Because Dropbox stores files in the cloud, you can access them from any device. For example, you can save your work presentation on your home computer and then open it on your office computer without using a USB drive or emailing it to yourself. Dropbox works on computers, tablets, and even smartphones to give you access to files on the go.
Dropbox also “mirrors” any files you upload, syncing local files on your PC to your files in the cloud. This means any edits you make to a file are automatically updated in Dropbox. If your computer crashes or you accidentally delete a file, you can easily recover it — and previous versions — from Dropbox.
Collaboration is another useful Dropbox feature. When you share files with colleagues or clients via email, attachments can trip spam filters or even end up in the wrong hands. In other cases, an attachment is too big and gets bounced before it reaches the recipient. With Dropbox, you can share files by sending a link instead of attaching a document to an email. You can also set various permissions to control access.
Signing Up for a Dropbox Account
Signing up for a Dropbox account is a straightforward process. When you first create an account, you’ll be asked to choose between the free and paid versions.
The free version of Dropbox, which is called Dropbox Basic, comes with 2 GB of storage. For most personal users, this is plenty of space. To get started, just click “sign up for free” on the home page.

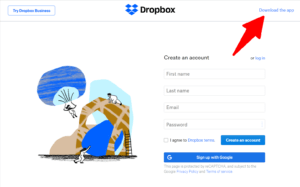
This will take you to an account creation page, where you’ll need to provide your name and email and create a password.
To use Dropbox, you must also install the Dropbox app on your computer. You can find the download button on the account creation page. Once you click “download the app” Dropbox will automatically download to your computer.
If you want to access your files from your smartphone, you can also download the Dropbox mobile app and then sign in with the same account you use for Dropbox on your computer. The beauty of Dropbox is that all the files you upload from your PC will show up in the mobile app, so you can view files on your phone.
Dropbox also offers a business version with three types of packages. There is also an enterprise version available for larger companies that need licensing for many users.
The paid business plans come with various pricing levels based on the number of users and the amount of storage space required. For example, the “standard” plan is $15 per month per user with 5 TB (5,000 gigabytes) of space. The “professional” plan, which is limited to 1 user, is $19.99 per month and offers 3 TB of space.

Getting Started with Your New Dropbox Account
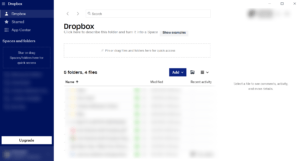
Dropbox features a user-friendly design, and most computer users will be able to get the hang of it with a little bit of practice. Once you’re signed up, you can drag files into the open Dropbox app or upload them from your Dropbox account. Your files will be saved locally on your computer and also backed up in the cloud.
After you create an account and download the Dropbox app, you’ll see a Dropbox icon on your desktop. After you install the app, Dropbox should launch on its own. If not, you can double-click the icon on your computer to open Dropbox.
When you open the app for the first time, Dropbox will ask if you want your files to be local or “online only.” The online only option is a paid feature, so most individual users will want to select the local setting.
Now you’re ready to start adding files to your Dropbox and saving your important documents to the cloud. But that’s not all Dropbox does. Let’s take a look at some of its most popular and useful features.
Using Feature #1: Uploading Files
Dropbox gives you a couple different options for uploading files. First, it’s important to note that the free (Basic) version of Dropbox doesn’t automatically sync new files you create on your computer’s local hard drive to the app. However, this feature is available with various paid versions.
If you’re using the Basic version, you can drag and drop your files into the app or upload them from your Dropbox account. Let’s look at the drag and drop method first. Here’s a step by step guide to get started.
Method #1
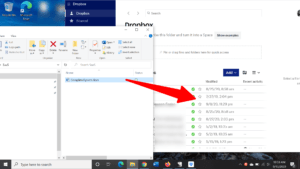
- Open the Dropbox app on your computer. You should see the main Dropbox dashboard.
- If you want to place a file in an existing Dropbox folder, click on that folder. If not, you can simply drag and drop a file anywhere on the main dashboard, and your file will automatically appear at the end of the list of folders. You can also create a new folder by clicking “add” and then choosing “folder” from the dropdown menu.
- Find the file or item from your hard drive you want to move into Dropbox. Click the item and drag it into Dropbox. Now it exists on your local computer and Dropbox.
Method #2
You can also upload files from your account at Dropbox.com. This is a useful method for times when you’re away from your regular computer and need to save a file so you can access it later.
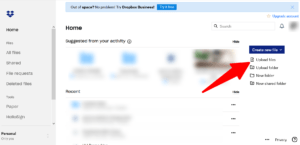
- Go to Dropbox.com and login to your account. You should see your account homepage.
- Click “upload files” on the right side of the page.
- Select the files you want to upload.
- Click “open.”
- Select “upload” to upload the files to a folder within Dropbox. You can also create a new folder and upload your files there.
Using Feature #2: Sharing Files
Dropbox also makes it easy to share files with other people without the need to use email attachments. There are a couple easy ways to do this.
The first method is to send the file to your recipient through the Dropbox system.The other is to simply share the link to your Dropbox file with the recipient.
Method #1: Send the File Through Dropbox
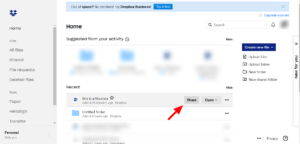
To send a file or folder through Dropbox, go to your Dropbox account and login. Then select the file or folder you want to send and click “share.”
This will generate a pop-up that allows you to enter the recipient’s email. You can also change the settings to control whether the recipient has permission to edit or comment on the file or folder.
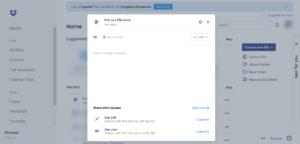
Once you enter a name or email address, a blue “share” button will appear. Click it to send your file or folder to your recipient. You can send to multiple people, and there is an option to attach a message along with the file or folder.
Method #2: Send a Link
You can also give someone access to a folder or file in Dropbox by sending them a direct link. To do this, go into your Dropbox app or account and select the folder or file you want to share.
Once you select it, a preview will appear on the right side pane. Click “share” then click “copy link.”
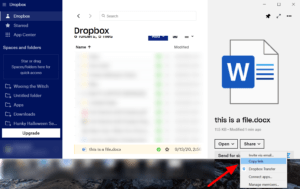
Now you have copied the link and you can paste it into an email, Slack or Skype chat, or any other communication system.
Using Feature #3: Creating a Shared Folder
If you work on a team or need to collaborate with someone on a project, Dropbox gives you the ability to create a shared folder so everyone involved can access files from anywhere.
To create a shared folder, login to your Dropbox account and click “new shared folder.” A pop-up box will appear asking you to create a new shared folder or make an existed folder shared.
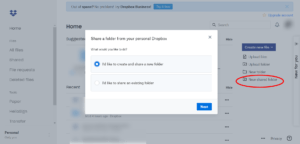
After you make your selection, click “next.” Another pop-up will appear asking you to name your shared folder. If you choose to share a folder that already exists, the pop-up will show you a list of all your existing folders and prompt you to highlight the one you want to make a shared folder.
Next, you enter your recipients’ name, just as you would for sharing an individual file or folder. When you’re done entering the name or email of everyone on the team or project, enter an optional message and click “send.”
Dropbox will send the notification to your recipients. If they already have Dropbox, they can add the file or folder to their own Dropbox account. If they don’t have Dropbox installed, they will need to install it before they can access the files.
Using Feature #4: Enabling Two-factor Authentication
Dropbox has come under scrutiny for security issues, which is one of the most frequent criticisms levied against it. In 2016, for example, cyber attackers exploited 68 million user accounts.
Some tech experts suggest ramping up your protection by investing in third-party encryption software. It should be noted, however, that Dropbox already uses 256-bit encryption for stored files and 128-bit encryption for files in transfer.
Also, while some third-party encryption software is free, the plans with the most features and protection cost around $50 a year for an individual and around $100 for a business.
Fortunately, Dropbox added features to help users keep their data more secure following the 2016 hack. One way to secure your account is by enabling two-factor authentication.
Two-factor authentication combines two forms of verification for your account. For example: a password and a one-time use PIN or numerical code sent to you via text or email.
To enable two-factor authentication for your Dropbox account, login to your account and click your profile photo. From there, click “settings” and then the “security” tab.
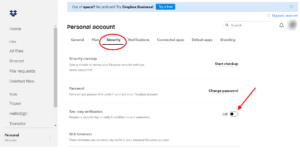
Next, go down to “two-step verification” and toggle the “off” button to “on.” Dropbox will ask you to reenter your password for security purposes, then the system will walk you through the steps for enabling two-factor verification for your account.
According to tech experts, two-factor authentication is one of the best ways to protect your documents and files from cyber attacks and data breaches. By enabling it for your Dropbox account, you can help keep your data more secure.
Conclusion
Dropbox is a convenient way to backup your files and make them accessible from anywhere. The free version offers generous storage and powerful features that make Dropbox one of the most popular cloud-storage apps on the market. Whether you want to backup your work, collaborate with a team, or access your files on the go, Dropbox is worth checking out.

