The Easiest Way to Set Up G Suite Sync With Outlook (GSSMO)
Using G Suite and want to use Outlook at the same time?
It’s possible.
You’ll have to jump through a few hurdles and there are requirements. But it is possible.
So if you’re tired of being locked into G Suite or Office 365, we’ve got you covered.
There’s a tool for using Outlook with G Suite, it’s called G Suite Sync for Microsoft Outlook.
What is G Suite Sync for Microsoft Outlook (GSSMO)?
GSSMO lets you use Microsoft Outlook and G Suite together. It’s a tool supplied by Google, free to G Suite admins, that lets you avoid using POP, IMAP, and other ‘under the hood’ methods that would require some technical know-how. Instead, you just install GSSMO and run it.
Here’s the data it synchronizes:
|
Outlook Data |
G Suite Import |
Use From Outlook |
Syncs with G Suite |
Notes |
|
Email messages |
Yes |
Yes |
Yes |
|
|
Email state (Read and Unread) |
Yes |
Yes |
Yes |
|
|
Deleted items |
Yes |
Yes |
Yes |
Import optional |
|
Folders and subfolders |
Yes |
Yes |
Yes |
Folders become G Suite labels |
|
Subfolders nested under Inbox (and other system folders) |
Yes |
Yes |
See notes |
No nested labels under Inbox, sent, etc. Gmail shows these as Inbox/Folder_Name |
|
Junk email |
Yes |
Yes |
Yes |
Import optional. Junk is Spam in Gmail |
|
Drafts |
Yes |
Yes |
No |
|
|
Attachments |
Yes |
Yes |
Yes |
Only attachments under 20MB will sync |
|
Executable attachments |
No |
No |
No |
Not allowed in Gmail |
|
Posts in mailbox folders |
Yes |
Yes |
No |
|
|
Importance levels |
Yes |
Yes |
Yes |
|
|
Message flags |
Yes |
Yes |
Yes |
Appear as stars in Gmail |
|
Follow-up dates and reminders (used with flags) |
No |
Yes |
No |
Not imported or synched with Gmail, but can be used in Outlook after importing |
|
Arrow icons with replies and forwarded messages |
Yes |
Yes |
No |
Appear for messages you reply to or forward in Outlook, but won’t sync with Gmail or other Outlook clients |
|
Rules |
No |
Yes |
No |
Not imported or synced but can be recreated in Outlook; can create Gail filters that apply for both interfaces |
|
Signatures |
No |
Yes |
No |
Not imported or synched, can be replicated in outlook and Gmail |
|
POP messages |
See notes |
Yes |
No |
POP protocol messages are synched when you import. Messages that arrive after you import are not synched. |
|
POP or IMAP account |
No |
Yes |
No |
Account settings don’t import, but account can be recreated in G Suite profile |
|
Category assignments |
No |
Yes |
No |
Not imported, but you can categorize messages in Outlook after importing |
3 Steps to Set Up G Suite Sync for Microsoft Outlook
GSSMO doesn’t work for everyone. There are system, G Suite, and other requirements.
The main requirement is that you have to be a G Suite Admin to set up GSSMO. If you’re not an admin, you’ll need to ask the G Suite Admin in your organization to set it up for you.
GSSMO Setup Requirements
These are the minimum requirements that you need to get GSSMO up and running.
1. G Suite requirements
You need a G Suite or G Suite for Education account, any tier.
2. OS requirements
GSSMO only works on Windows machines because it’s reliant on the MAPI (Messaging Application Program Interface) protocol which Mac OS doesn’t support.
These operating systems support GSSMO:
- Windows 10 (32 and 64 bit)
- Windows 8 (32 and 64 bit)
- Windows 7 (32 and 64 bit)
- Windows Vista SP1 (32 bitand 64 bit)
Microsoft has withdrawn support for Windows XP and 2003 Server so GSSMO no longer supports them either. To use GSSMO, you must be the local administrator for your computer.
3. Outlook requirements
GSSMO supports a range of Outlook versions, including:
- Outlook 2019, 2016, and 2013 (32 and 64 bit)
- Outlook 2010 (32 and 64 bit) — requires this Microsoft hotfix
- Microsoft Outlook 2007 with Office SP2
- Microsoft Outlook 2007 with Office SP1 — requires this Microsoft hotfix
- Microsoft Outlook 2003 with Office SP3
4. Port 443
GSSMO uses port 443 on your domain, which is the standard TCP port for websites that use SSL. Any site whose URL starts with “https” is being accessed via port 443 so yours is almost certainly already open if you already have an HTTPS site. If you don’t, you may have to set this up.
Setup GSSMO in Google Admin Console
Here’s how to set up your Google Admin console to work with GSSMO.
Gmail
First, set up Gmail to sync with Outlook.
Head over to the Admin Console, and go to Apps -> G Suite -> Gmail.
Then go to End User Access (just above Advanced Settings) and switch Enable G Suite Sync for Microsoft Outlook for your users to ON:
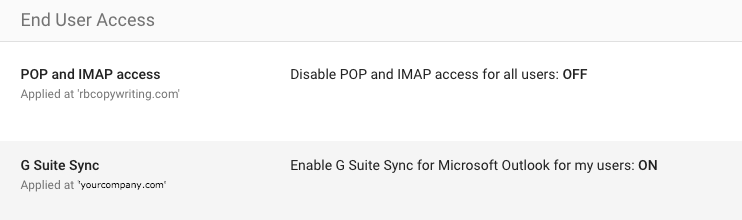
Click Save to save the settings. Gmail is now ready to go.
Calendar
Now we need to do the same thing for Google Calendar. You’ll need to turn on the Calendar service so users can create profiles.
Go to Apps -> G Suite ->Calendar in the Google Admin dashboard, and click Edit Service:
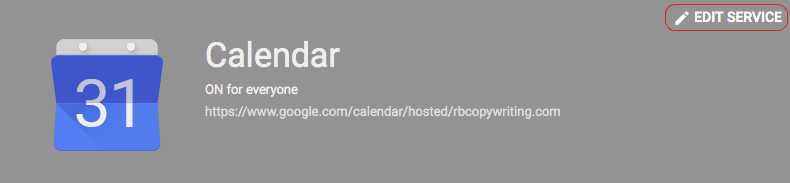
Switch Calendar to ON for everyone.
Global Address List (GAL)
The Global Address List is an address book that lists everyone in the organization.
Here’s how to use the GAL generator, so everyone’s contact details go into the GAL:
Go to Security -> API reference in the Dashboard.
Check the Enable API box:
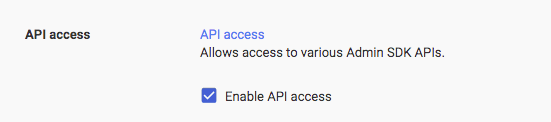
Click Save to save the setting.
Then turn on contact sharing, so the GAL is dynamically updated for everyone.
In the Dashboard, go to the Menu, then to Directory ->Directory settings -> Sharing settings.
Select Enable contact sharing:

Click Save.
Google Drive Service and Apps
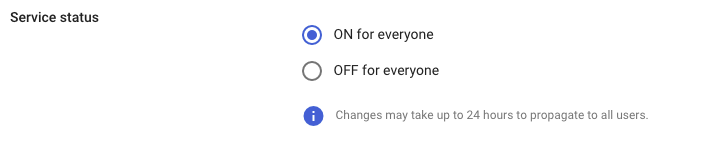
Make sure Drive is turned on for your users. It almost certainly is but if you want to check, or if for some reason it’s not, go to Apps -> G Suite -> Drive and Docs and click Edit Service. Like in Calendar, this will be in the top right-hand corner of the gray box a the top.
Make sure Service Status is set to ON for everyone:
You also need to allow your users to install Drive apps so they can access GSSMO.
Go to Apps -> G Suite -> Drive and Docs -> Features and Applications, and go to the Drive SDK section and switch it to ON.
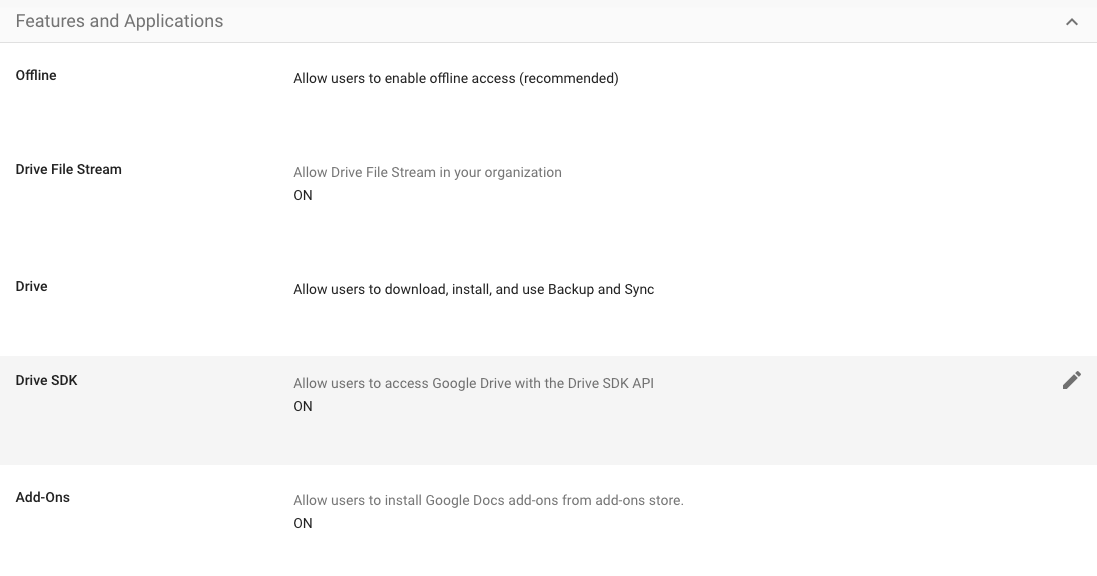
Click Save.
Now that you’ve set up G Suite to handle GSSMO, you need to install the tool itself.
Install GSSMO on Your Organization’s Computers
Even Google can’t handle this one in the cloud. If you want to sync Outlook with G Suite, you have to install GSSMO on your computers. Again, they have to be Windows machines, GSSMO doesn’t work at all on Macs. There are two ways to do this. You can push an MSI (Microsoft’s default installer file extension) file to your organization’s members or you can let your users download and install GSSMO for themselves.
Pushing an MSI file
Download the correct MSI file:
- 32-bit enterprise_gsync.msi — this is the file for Outlook 32-bit editions
- 64-bit enterprise_gsync.msi — this is the file for Outlook 64-bit editions
Send your users the right link, depending on your Outlook version, and give them the link to the Install GSSMO page for reference.
They should be able to simply run the MSI file, then from the Windows Start menu, click All Programs -> GSSMO > Set up a GSSMO user.
Let users install GSSMO themselves
Your users can visit the GSSMO download page, then click Download. That should be all that’s required.
Importing your data
GSSMO users can import data from an Exchange account or from an Outlook PST file. GSSMO uses G Suite Migration for Microsoft Outlook (GSMMO).
GSSMO usually launches the migration tool automatically when the user imports data to create another user profile or imports data after they create their profile.
GSMMO is also available as a standalone migration tool, accessible from the Windows Start menu by searching for G Suite Migration for Microsoft Outlook.
When you use GSMMO as a standalone tool. it’s less effective since it doesn’t import Outlook notes, tasks, or journal entries. To import these, it’s best to use GSSMO right from the start.
Troubleshooting your G Suite Sync Setup
Most issues with GSSMO can be resolved by two variations of the classic ‘turn-it-off-and-on-again’ fix. Either reinstall Outlook, or recreate your G Suite profile.
Replacing your G Suite profile
To recreate your original G Suite profile in Outlook you’ll need to first remove the existing profile. This doesn’t delete the data from your G Suite account, but it does delete your Outlook settings: signature, custom category definitions, and all your other changes from the default.
Go to your Windows Control Panel -> mail settings, select Show Profiles, then select the profile you want to remove and delete it.
The go to your Start menu, find All Programs -> GSMMO -> Set up a GSMMO User and recreate your profile.
Reinstalling Outlook and GSSMO
If replacing your G Suite profile didn’t fix things, you might want to reinstall Outlook and GSSMO.
Uninstall GSSMO from your machine the same way you would uninstall any other program, then uninstall Microsoft Outlook.
Reinstall Outlook from the original disk or install file, then download GSSMO and reinstall it. You’ll have to set up your profile all over again from scratch. Remember not to import data from your old Outlook profile, it’s already in your G Suite account!
Restart your computer.
If that doesn’t work, Google has troubleshooting advice for Admins here.
The Downside to using G Suite Sync for Outlook
GSSO doesn’t always work correctly. And getting GSSMO set up isn’t the end of your synchronization story. For instance, sometimes the GSSMO doesn’t sync Calendar invitations properly. This happens when the person sending the invite uses a winmail.dat attachment instead of sending the invite in iCal format.
Other common problems include:
- GSSMO icon grayed out: with weak internet connection or Outlook running in offline mode, GSSMO isn’t available and synchronization stops.
- Emails as attachments don’t open: unlike Outlook, GSSMO doesn’t let you send an email as an attachment, and it supports a very restricted range of file types.
- Cannot import email between folders in Outlook: often, the folder you’re moving the emails to isn’t available in Gmail, causing GSSMO to fail to sync.
In other words, despite Google’s best efforts the synchronization between the two suites isn’t perfect. You can find Google’s troubleshooting guide to common GSSMO problems here.
Other options for using G Suite with Outlook: IMAP
Any two email tools can be linked with IMAP. The big selling point for GSMMO — apart from integrating calendars and other apps — is that it doesn’t require you to use IMAP, but if you want to, here’s how to do it:
Enable IMAP in Gmail
Sign in to Gmail and go to Settings under the Gear icon. Select POP/IMAP:

Enable IMAP and save changes.
Set up Outlook for IMAP
Go to File -> Info -> Account Settings in your Outlook menu and choose New in the Email tab.
Select Email Account, then click Next, choose Manual Setup and select POP/IMAP. You’ll need to enter the following details:
- Your name
- Your G Suite email address
- Account type — choose IMAP
- An incoming mail server — enter imap.gmail.com
- An outgoing mail server — enter smtp.gmail.com
- A Username. This should be your G Suite username, the same as your G Suite address.
- Password. This is your G Suite password.
Messages sent to and from Outlook should now show up in your Gmail inbox, but this method doesn’t give you synchronized calendars or other apps.

