How to Share a Dropbox Folder
Dropbox has a couple of features related to sharing folders with other users.
Many people think that sharing folders and sending sharing links is the same thing but there’s one main difference.
When you share a folder, the way we’re going to discuss in this post, only people who have an active Dropbox account can view, edit, and download the files from it.
If you want to send view-only files or folders to a friend who doesn’t use Dropbox, you should consider sharing them through a link.
And even though sharing folders doesn’t work for people that don’t own a Dropbox account, it can be extremely useful when trying to share large folders.
One of the main benefits is that you can control who has access to which files in the folder you’re sharing.
You can also restrict users’ editing access by putting them on view-only for certain files in the folder.
And all updates that are made to the shared folder are updated live for all users who have access to it.
That way you can communicate through comments and edit files together depending on your current project and ideas.
Now that you know all the practical benefits that come with sharing Dropbox folders, it’s time to learn how to share folders with your family, friends, and colleagues.
Sharing folders can be done from your desktop app, browser account, and your smartphone/tablet.
The latest statistics show that people use Dropbox mostly on their computers compared to their phones and other devices, so let’s first look at…
How to Share a Dropbox Folder On Your Dropbox Desktop App
The process of sharing a folder on your computer using the Dropbox desktop app is quick and simple.
Just follow the steps below and you shouldn’t encounter any setbacks:
Step #1 Open your Dropbox desktop application
For this step, you must already own an active Dropbox account and you should have the Dropbox application installed on your computer.
If you don’t have it opened already, you’ll probably find a shortcut to it on your Desktop.
You can also type “Dropbox” in your Computer Search Bar and open it from there.
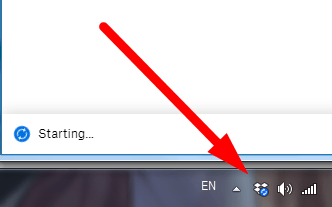
Step #2 Click the Dropbox icon in your menu bar/system tray
Once you open your Dropbox desktop application, you should see a Dropbox icon in your menu bar for Mac and system tray for Windows.
This icon acts as the quickest way to open your Dropbox folder and start using, updating, or sharing your files.
You can also easily locate and update your Dropbox settings after clicking on it.
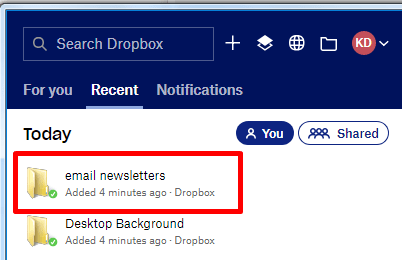
Step #3 Find the Folder you want to share
After opening your Dropbox desktop application, you should find the folder you want to share.
It should be on top if you’ve just added it to your Dropbox.
The other way to find it is to use the Search Bar on the top left of the screen you see.
You can also see it in the image below (Search Dropbox):
Step #4 Click on the “…” next to the folder you want to share
When you find the folder you want to share, you should hover over it with your mouse.
Once you do that, you’ll see 4 new buttons appear on the right side of the folder.
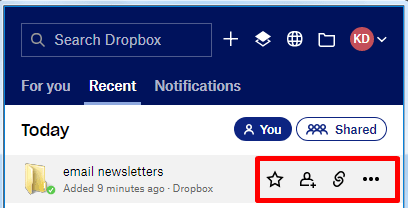
Click on the “…” button and you should see a dropdown menu pop up:
Click on the “Share…” button and a new window will appear.
Step #5 Type the name, email, or group of people you’d like to share your folder with
The easiest way to share your folder is to type the email of the person you want to share the folder with.
It’s completely optional but you can also add a message to go with the folder.
This is a great way to give instructions or additional information about the files you’re sharing.

Then you can select whether the person can edit or only view the files you’re sharing.
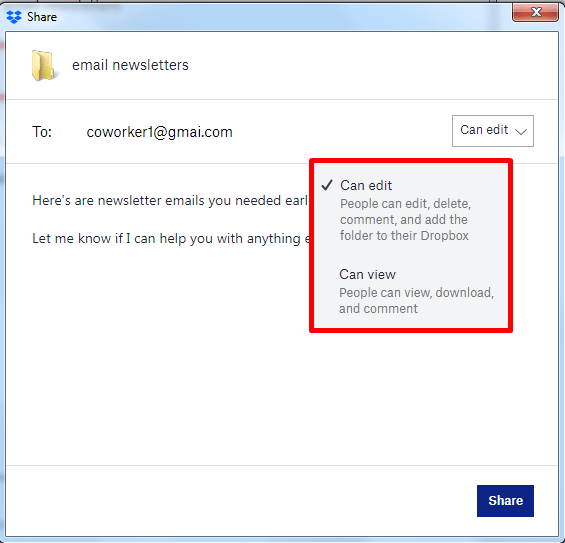
Click on the one that fits your situation best and then complete the sharing process by clicking on the blue “Share” button on the bottom right corner of your screen.
That was the step-by-step process of how to share a folder using your desktop application. Now let’s go over…
How to Share a Folder On Your Phone
Sharing a Dropbox folder using your phone is just as easy as doing it on your computer.
Follow the steps outlined below and you’ll be able to share your folders in seconds:
Step #1 Open your Dropbox mobile app
Once again, for the first step, you need to have Dropbox installed on your mobile device and you’ll also need to own an active Dropbox account.
Step #2 Tap on Files
This button should be located on the bottom of your screen.
Step #3 Find and Open the Folder you want to share
You can find it by scrolling through your folders or simply using the search bar to find it by name.
Step #4 Tap on the “Share” button
You should see a Share button. It may be different depending on your phone but it’s generally located on the top right corner of your screen.
Step #5 Type the name, email, or group of people you’d like to share your folder with
This step is the same as in the Desktop process we shared above.
You can once again choose whether the people getting access to this folder can edit or only view the files inside the folder.
Step #6 Click Share again
The people you selected will receive an email with a link to the folder you just shared.
This was how to share a folder using your computer Dropbox app and your smartphone.
The process for sharing a folder through the browser version of Dropbox is the same as with the Desktop app.
And even if you’re using a different device, like a tablet, the process follows the same steps.
Just use them and you’ll share your folders in seconds.
Now that you know how to share folders both through your computer and smartphone, it’s a good idea to learn the process of unsharing a Dropbox folder.
How to Unshare a Folder
If you changed your mind about who can view and who can edit your Dropbox shared folders, you can always use the unshare feature.
It’s important to know that you can control who can view and edit your shared folders but you can’t delete files that are already downloaded into another user’s account.
That means if the person you’re trying to remove already copied your files onto his Dropbox, there’s nothing you can do to manually remove his copies of the files.
There are two ways to restrict access to your shared folders.
- You can unshare the entire folder.
- You can remove a specific user from the folder.
If you want to unshare a folder you must be the owner of that folder.
Once you unshare a folder, all files get permanently deleted from all accounts that previously had access to them.
You can do this any time you want even if other people are currently using the files in the folder.
On the other hand, if you want to remove a specific user from a shared folder that you own, you will get additional options.
You can choose to leave the person with a copy of the files on his Dropbox and just restrict future syncing with the folder.
That means he’ll no longer have access to files that get added, removed, or edited in the future.
Now that you know what to expect, let’s go over how to use both methods correctly:
Unshare a Dropbox Folder using your Dropbox desktop app
This is a quick 5-step process on how to unshare a folder using the Dropbox desktop app:
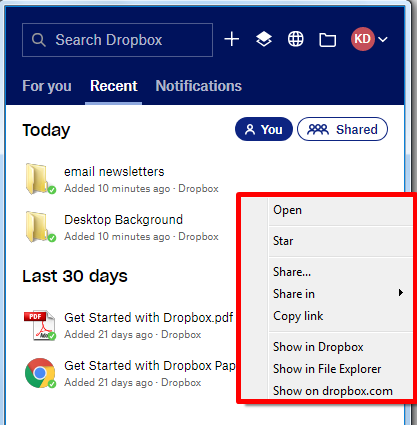
Step #1 Find and right-click the shared folder.
Step #2 Click the “Share…” button.
Step #3 Click on the Settings Icon (typically looks like gears).
Step #4 Click “Unshare Folder”.
Step #5 Click Unshare again.
Once you click the Unshare button, this folder will be deleted from all users’ Dropbox accounts.
It will remain in your Dropbox account and you’ll be able to share it again in the future if you want.
Mentioning again that if the users that had access to the folder made a copy of the files inside of it, you’ll no longer be able to delete these copies.
When you work with teams, sometimes you need to restrict a specific person from accessing the files in the folders you’re sharing.
So here’s how to…
Remove a User from your Shared Folder
Follow the steps below to remove a specific user from your Dropbox shared folder:
Step #1 Find and right-click the shared folder.
Step #2 Click the “Share…” button.
Step #3 Click on the dropdown menu next to the person you want to remove.
Step #4 Click on the “Remove” button.
Step #5 Choose whether the user should receive a copy of the folder or not.
Step #6 Click Remove and you’re done.
The users you remove will no longer be synced with this folder.
That means any changes you make to the folder will only be seen by you and the other members that have access to it.
And when you’re working with big teams and you have to give and restrict access for each work folder, things can get a little tricky.
That’s why it’s always useful to know who has access to which folders.
How to See Who’s On Your Shared Folder
You can check who has access to your shared folders in a couple of ways.
Let’s go over the quickest way to do it using you Desktop app:
Step #1 Open your Dropbox desktop application.
Step #2 Click the Dropbox icon in your menu bar/system tray.
Step #3 Find the Folder you want to check.
Step #4 Click on the “…” next to the folder.
Step #5 Click on the “Share…” button.
Step #6 Look at all the users that have access to the folder.
Your screen should look like the image below in which the folder is shared with 1 person:
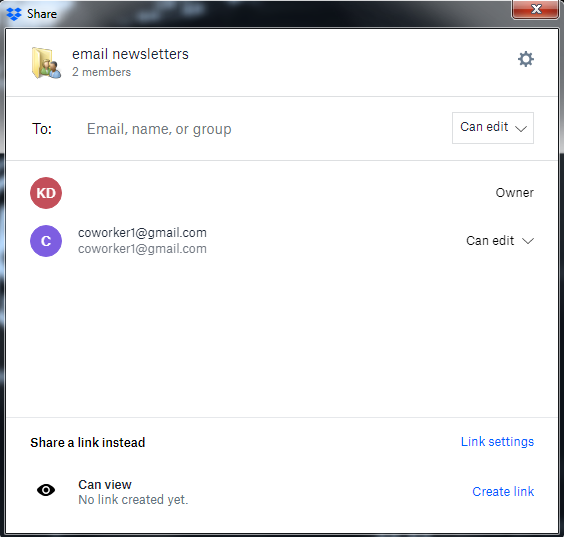
Everyone that has access to this folder should appear here.
You can control who has editing and view-only access.
If you haven’t shared the folder with anyone, this space should be empty.
How to Leave a Shared Folder
Now that you know how to use Dropbox sharing options efficiently, we expect you to start sharing folders left and right all the time.
And while doing so, you’ll probably receive access to a lot of folders that are originally owned by other people.
If you’re using an individual account, you’ll have to download all the contents in the folders in order to use them.
And sometimes this can get a little heavy on your hard drive.
If you’re currently facing this problem, here’s a step-by-step process of how to leave a shared folder using your Dropbox desktop app:
Step #1 Open your Dropbox desktop application.
Step #2 Click the Dropbox icon in your menu bar/system tray.
Step #3 Click on “Shared” on the top right corner.
You should see a full list of all the folders you have access to.
Step #4 Find the Folder you want to leave
You can’t manage the folder itself, as it is not owned by you, but you can edit it.
Step #5 Click on “Click edit”
Step #6 Click on “Remove my access” (it should be in red).
You’ll be asked if you would want to save a copy of the folder you’re leaving.
If you don’t need access to these files, just decline.
This should permanently remove the folder from your Dropbox.

