How to Permanently Delete Your Evernote Account
So you’ve decided to say goodbye to Evernote. Maybe you’re swapping over to one of the alternatives like OneNote, Bear, or Notion. Maybe all of your files are already on Google so you’re going to give Google Keep a shot.
Whatever your reason, you need to know the difference between deactivation and deletion. And why deletion is so important. Lastly, we’ll help you figure out how to export the data you want to keep, and give you a step-by-step guide for how to permanently delete all of your Evernote data.
The difference between deactivation and true deletion
Closing your Evernote account or stopping payment doesn’t delete your data. It doesn’t delete anything, not even your financial information.
All of your notes, recordings, and images will still be stored on Evernote’s cloud servers. It will also still be potentially accessible on any device you used to access Evernote. If your Evernote was mostly shopping lists, maybe this isn’t that big deal of a deal to you. However, your profile does contain information about you personally that you might want to take control of.
The dangers of not permanently deleting your Evernote account
There are two lanes of data that could be accessed and used if you don’t permanently delete your Evernote account.
The first lane of data is your account information: your name, password (which might be shared with other accounts you still use), credit card, and/or your PayPal information. Hackers could still get your address, phone number, and any other profile information you’ve added to your account.
The second lane of data is the content you’ve put into Evernote. Notes, research, confidential data, proprietary information, sensitive images, videos, and intellectual property you’d rather keep to yourself could all be grabbed.
For teachers, a breach of Evernote data could leave minors’ confidential medical or mental health information up for grabs. For medical professionals, even cursory mentions of patients could be a HIPAA violation. For lawyers or psychologists, a breach of their notes is a breach of legally protected privilege.
Or, perhaps you’re a writer, artist, or inventor who needs to keep their work secret and safe. Either way, permanently deleting your Evernote data is key.
How to migrate notes and data you want to keep
Before you permanently delete all of your work, think first if there’s anything worth saving. The answer is probably yes.
Migrating can be done in three easy steps:
Step 1: Download the Evernote desktop app and install it.
Step 2: Go to “File” and “Export.” A pop-up will offer you four choices.

Step 3: Choose a file format to export.
ENEX format is going to be your go-to option for most use cases. ENEX is compatible with many note-taking apps (like Microsoft OneNote) and will maintain your Notebook and Note organization. Exporting to an HTML Web Page creates one .html file with directories for images, text, and other files. The MHT (MIME HTML) file format is for creating a single web archive in a single file. The “Multiple Web Pages” option does what it sounds like, making a webpage for each Notebook.
That’s it. You’ve successfully exported all of your Evernote data.
Now it’s time to delete everything from the cloud and devices.
Step-by-step: Permanently deleting Evernote
Now you’ve decided to annihilate your Evernote information. The important notes are backed up, and you’re ready to leave nothing but scorched earth where your account used to be.
Step 1 – Leave any shared Notebooks
Are any Notebooks shared with you, from another account?
If so, go into the “Shared” section of your Notebooks. If using the desktop app, right-click on the shared Notebook and click “Leave Notebook.” On the browser version, click on the shared Notebook to open it, click on the ellipsis (the three dots graphic) “options” menu, and then click “Leave Notebook.”
Step 2 – Delete your Notebooks
Right-click on a Notebook and select “Delete Notebook.”
On the web app, like above, open the Notebook and find “Delete” in the ellipsis options menu. This will move the Notebook and all notes into the trash. Do this to all of your Notebooks until the list is empty.
Step 3 – Empty the trash
On the desktop app, navigate to the trash and right-click. Then, select “Empty Trash.” On the web app, open the trash and find “Empty Trash” in the options menu.
This will completely erase your notes and Notebooks. They will be irretrievable, even by Evernote staff. Once again, make sure you have backed any Notebooks up using the methods at the top of this article. Failure to do so may result in tears and we will not be responsible.
Step 4 – Empty the business trash
This step is only for admins of Evernote Business accounts who need to delete company notes permanently.
To empty the company trash, log into the admin console as usual. From there, click on “Trash” in the navigation area. All of the notes or Notebooks in the trash will have check boxes—click the ones you want to delete. Then, hit the “Delete” button and confirm the pop-up.
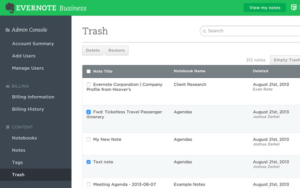
This will not only delete the notes permanently but remove them from user accounts who may have had access to them.
Deactivating Evernote permanently
Now that all of your notes are properly deleted, here’s how to deactivate your account.
It’s simple: go to the Evernote Account Deactivation Page. Make sure you are logged into the right account. Then you’ll be given a small checkbox and a “Deactivate Account” button. Do not take this action lightly—it’s irreversible.
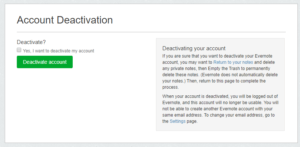
Again, deactivating your account won’t delete your notes. So make sure you’ve done that first. Deactivating your account will permanently shut down the account—it cannot be reopened. You can’t even use the same email to open a new account in the future. You’ll have to use a different email if you ever come back. Deactivating your account will log you out on the browser and prevent you from logging back on mobile or on other platforms.
Once you’ve deactivated the account, you’re done.
If you’re the type who doesn’t trust your pants will stay up without a belt and suspenders, you have one more option. You can open a support ticket with Evernote and request that they delete your username and email. They will then purge you completely. The deactivation page should do this already but you can’t go wrong being careful. And if you’re already nervous about online privacy or data security, it can’t hurt.
Finished with Evernote?
Your Notebooks are deleted and your account is deactivated. From there, the only thing left to do is uninstall any apps on your devices. Your laptop, desktop, phone, etc.
Now you can import your notes to one of the many Evernote alternatives and get back to work.

