8 Tips to Collaborate in Google Docs
When it comes to the best way to collaborate on a document, it’s hard to beat Google Docs.
If you are having trouble using Google docs for collaboration, you might not be using all parts of the animal so to speak, and leaving untapped teamwork potential on the table.
Think of this like a Google Docs collaboration tutorial: I’ll explain why it works so well, and give 7 tips that will help your teams take advantage of everything the product has to offer.
Why Google Docs is perfect for collaboration
The number one reason people use Google Docs is because it makes their life easier.
Whether teams are sharing documents privately or preparing a report for web publication, there is no word processing option that allows people to work together as smoothly.
Some of the key qualities that make Google Docs effective for collaboration:
- It’s easy to learn
- You can co-edit in real time
- You have access your files anywhere and secure shared storage on Google Drive
- Permissions are flexible
- It’s free, or available for businesses with G Suite
The Google Docs app is brilliant. I would rather compose on my laptop, but if I have to work on my phone, it’s surprisingly manageable. Reviewing suggestions and responding to comments is really easy on the app, which prevents people from having to wait on small edits.
Microsoft Word is a deeper product — more fonts, features, formats, etc.— but there’s a steeper learning curve and limitations when you save a word document as a web page. Much of what Docs lacks in comparison to Word isn’t essential to collaboration, unless print publications are a major concern.
If you are set up in Microsoft 365, Word may be what you want. But all other things being equal, Google Docs is going to be an easier option for most teams.
8 Tips for Collaborating in Google Docs
Tip #1: Increase feedback with flexible sharing
Google Docs collaboration begins when you share a file with someone else.
Think of the range of people that you work with. Some will only need to view what you wrote, others may have things they want to say, and some of your closest collaborators may even want to make changes to the document.
When you share a file in Google Docs, you can assign sharing permissions that vary from person to person. This can be crucial when working with a mix of roles, responsibilities, and knowledge.
Begin by clicking the share button in the top right corner:
![]()
This opens up a new window:
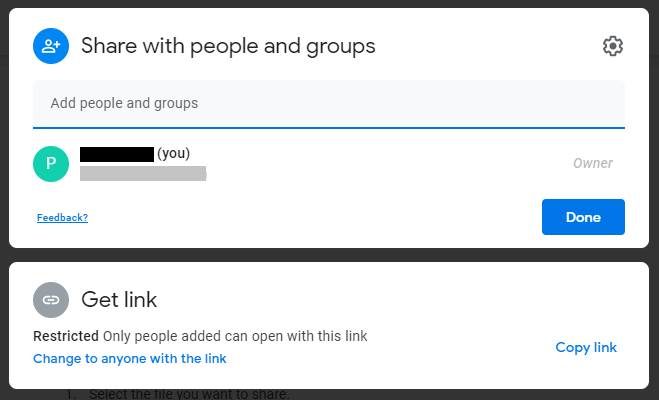
These are the two ways you can share Google Docs. You can:
- Share with people or groups using their email address
- Create a link that you can share
Let’s go through these one at a time.
Collaborating in Google Docs with email addresses
If you decide to use email addresses to collaborate in Google Docs, this is what you see:
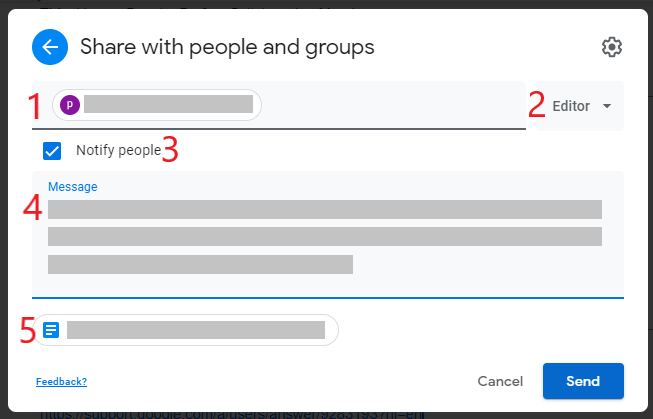
From here, you have control of how your document is shared, how it is received, and who can do what. Here’s the breakdown:
- The email addresses of the people you want to share with. Google’s predictive search is very good, so just start typing and the dropdown will populate with the addresses of your most routine collaborators.
- This is where you control permissions, setting recipients as:
- Viewer: read only access
- Commenter: ability to make comments and respond
- Editor: ability to make changes to the document and view version history
- You have the option to notify, which will send an email to the addresses you include.
- You can leave a short message with context or explanation
- This shows the doc you are going to share
You can control the permissions of individual collaborators, which can be extremely helpful if you only want certain people to be able to make changes to a document that many others will read.
Here’s a set up with varied permissions, that can be changed at any time:
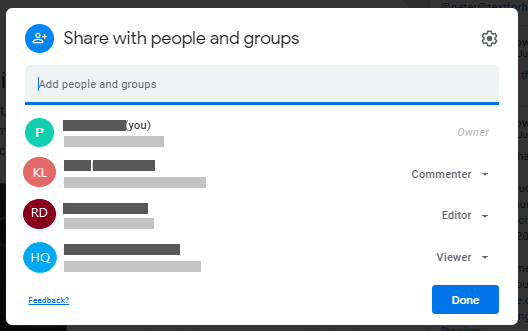
One final important note: People who are shared on Google Docs will be limited to read-only unless they have a Google Account, which is free.
Collaborating in Google Docs with shared links
If you want to share with people, but you don’t have email addresses, you can create a link anyone can share.
To create a link, click the share button. Then click Get Link instead of entering emails:
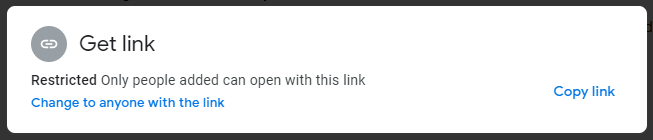
The default setting for links is restricted, which means that people still have to be added in order to access the document.
This is great if you want to leave a link on a board or in a comment without attaching the doc via Drive. Others can see the link, but an added recipient can use it.
If you want a link anyone can access, select “Change to anyone with the link,” which brings up a new window where you can set permissions:
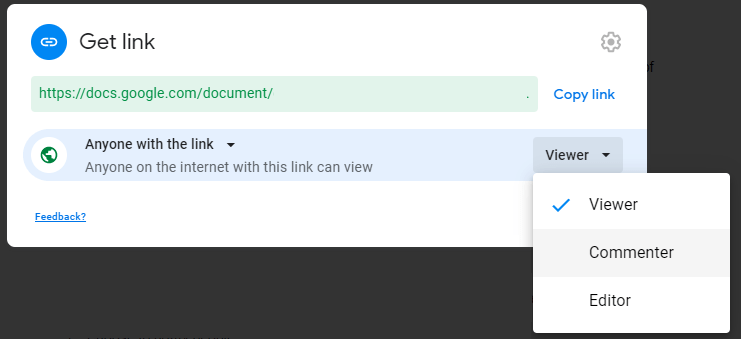
This is great for webinars, or if you want your colleagues to be able to share the doc with their own teams, outside the organization, etc.
Regardless of how you choose to share Google Docs, as a document owner, you can stop, limit, or change sharing settings at any time.
Tip #2: Co-edit in real time
Once people are shared, they’ll be able to view, comment, or edit the document. Up to 100 people can work on the same Google Doc at a time. You’ll see the people viewing the document in the upper left hand corner:
![]()
And you will also be able to see where they are working in the text, as their cursor, highlights, and changes will be captured in the same color as any changes they make:
This is a powerful capability, and it is going to take teams time to be able to work productively at the same time. Without direction, co-editing can devolve into uncut chaos, so be sure that you have planned out an agenda for this type of collaboration meeting.
Tip #3: Use video meetings with a shared screen
Why not chat face-to-face about your latest Google Docs collaboration?
Some of the best video conferencing software is free. Combine that with the real-time co-editing potential Google Docs, and even the most remote team can feel like they’re sitting around the same table. Here’s how you get set up:
- Share the Google Doc with the team
- Set permissions appropriately
- Host a video conference and invite the team
- Open the shared Doc
- Share screen
And that’s it. Now, everyone can write, comment, talk, and contribute in real-time.
Tip #4: Collaborate through comments
It’s not always possible, or optimal, to have people working on a document simultaneously. You can leave comments associated with particular words or sentences that are visible to people who have access to the Google Doc.
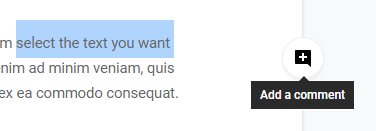
Highlight the text you want to comment on, and the Add Comment option will appear on the right side of the page, represented by a call out icon with a plus:
Add Comment is also available in the toolbar:

You can also find the Add Comment option in the drop-down list under Insert, or simply use the hotkey (Ctrl+Alt+M).
When you add a comment, it opens a box on the right side of the screen that is linked to the text you highlighted. Here, anyone who can view the document can see the comment and its associated text or place within the document. If they have permission, they can reply directly to specific comments, beginning a thread:
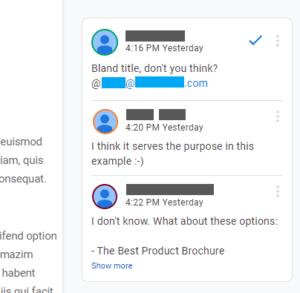
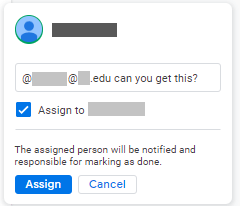
Tagging people in comments with @mentions adds them to the discussion, and sends them an email letting them know they’re part of the conversation.
You also have the option to Assign the @mention, which notifies the person that they are responsible for marking the comment as done:
Using comments allows people to collaborate at a realistic pace over the lifespan of a project. As their other workload fluctuates, they can stay up to date with the changes people are making.
Tip #5: Use TOC to coordinate collaborative writing
To help you structure documents, Google Docs automatically creates a table of contents (TOC) that updates in real time. This tool is a godsend to people who edit content for the web, but it can be used effectively by teams to coordinate any type of collaborative writing.
Take a look at the sample product brochure and TOC:
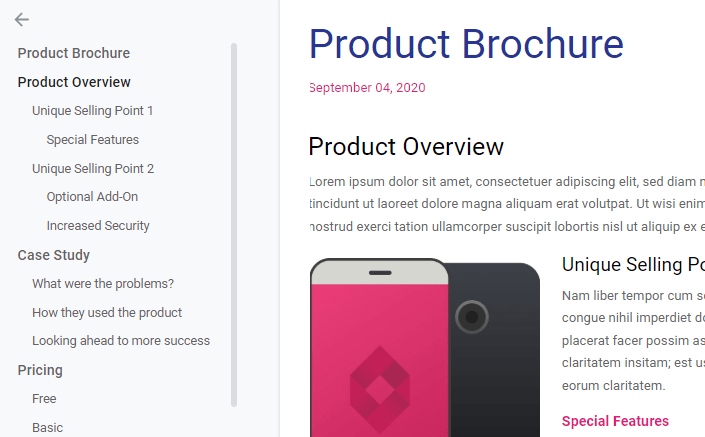
On the left, there is a clear breakdown of the basic sections of the brochure. Clicking on any header or sub-head will bring you to its location in the Google Doc.
This is a basic example, but for teams with massive documents, the TOC is a huge time-saver, It also gives you the ability to visualize your content organization as you build.
You can use the TOC as a means of dividing tasks for creation or review. The clear structure provides shared reference points as the team assigns responsibilities, and segments the workload into intuitive portions.
To take advantage of this feature, you’ll need to use the style toolbar. Begin with a new Google Doc or start organizing something that’s written already.
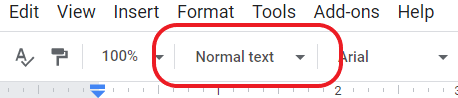
By default, Google Docs thinks you are composing in “Normal text.” This doesn’t mean you are a boring writer, it’s just that what you type won’t show up in the TOC.
In order to make text part of the document’s structure, highlight the desired portion, and click the styles dropdown in the toolbar:
This will give you a dropdown list of options to style the text as a Title, Subtitle, Header 1, Header 2 and so on. These appear in the table of contents, outlined according to the heading style you chose:
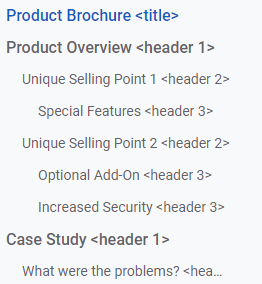
Note: In this example, I’ve enclosed the
In the document itself, the size and font of the heading will change to reflect its place in the structure, i.e. heading are bigger and bolder than subheadings. You have the freedom to set the size and font of the headers to be whatever you want, and save the style settings for future use.
The end result is a cleanly divided document that is easy to navigate for all users. It’s not hard to start using headers to help the team organize, and once you do, you won’t look back.
Tip #6: Bookmarks
Sometimes you want a collaborator to look over a whole document —sometimes it’s just a section. By inserting bookmarks, you can create a link that will bring someone directly to a specific point within the document.
You can share this link as you would any other URL, and leave any number of bookmarks within your Google Doc.
To insert a bookmark: highlight or leave your cursor at the desired location and select Bookmark from the Insert drop-down in the toolbar. This creates a blue ribbon icon that denotes the Bookmark, and if you click on it, you will be given the option to copy a link to the bookmark or remove it.
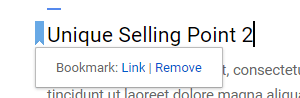
Bookmarks create a shared point of reference within documents, and are especially helpful for drawing attention to sections that aren’t easily identified by the table of contents.
Tip #7: Suggestion mode
Whether you are co-editing a document live with others or passing it through a pipeline, it can be fairly challenging to keep track of all the changes people are making.
Collaborators in Google Docs can make suggestions instead of changes, which preserves the old text alongside the new. The document owner then has the option to accept or reject the suggestions, either as a batch or one by one.
This makes it much easier for groups to understand what’s changed and why, and you can work through the suggestions together, using comments or Meet to talk through tough decisions.
Note: people need commenter or editor permissions order to suggest edits.
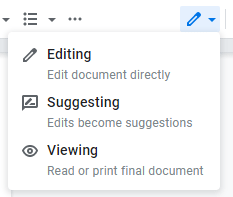
To start using suggestions, click the editing mode icon in the upper right corner:
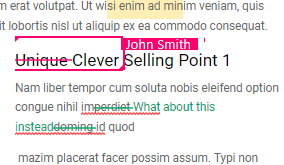
Once you are in suggestion mode, any changes you make will be clearly marked and text you delete will be presented in strikethrough instead of deleted. Here’s a header with a suggested change of words:

Instead of navigating a brand new draft, the final editors can see the exact changes that have been made. Suggestions are color-coded according to whoever made the change.
All this information about the document’s composition can be a double-edged sword, especially for people who are unfamiliar working in suggestion mode, as a Google Doc full of suggestions looks very busy to the untrained eye.
There are two ways that Google helps you stay organized.
First, you can always shift to viewing mode, which will let you see the final document without the suggestions. The ability to alternate between editing modes helps you navigate and provides another layer of context.
Second, suggestions are broken out like comments that explain what could be changed. As the document owner, you have the option to either accept or reject each change:
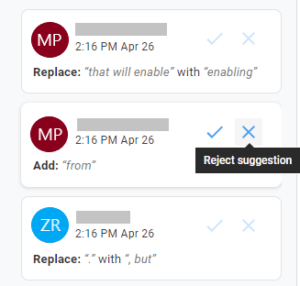
You can accept all of the changes at once, which is nice if you have just deliberated as a group over the suggestions. You can also work through suggestions one by one, which makes collaborating on Google Docs from your phone incredibly easy.
Tip #8: Version history
One thing people really like about Google Docs is that it automatically saves your work as long as you are online. No sooner have you started typing that the app is saving, letting you know just above the toolbar:
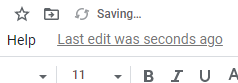
If you click on the underlined text that describes the most recent edits, it will bring up the entire revision history of the document on the right side of the screen. Each revision shows a discrete draft and the people who worked on it:
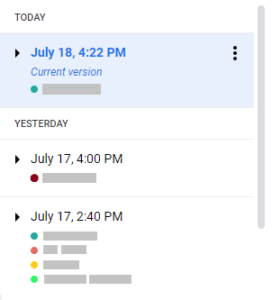
You have the option to name certain versions that represent milestone drafts or as templates for future document creation.
Looking back can be helpful for a number of reasons, not least of which includes having previous drafts if something goes wrong with the current one. There’s also the psychological benefits that come with knowing that serious revision can take place without deleting the work that came before.

